Zoho CRM : Set up an Autoresponder
To set up autoresponders
- Click the Leads/Contacts tab.
- In the Leads/Contacts Home page, click More Actions
 > Autoresponders.
 - In the Autoresponders page, click Create Autoresponder.
- In the New Autoresponderpage, do the following:
- Enter the Name of the autoresponder.
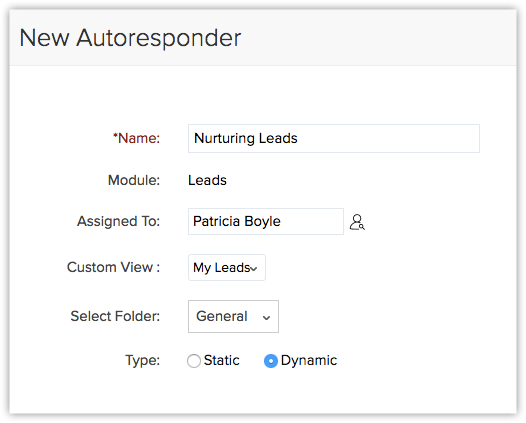
- Select the owner of the records from the Assigned To pick list.
By default, the field displays the name of the user who creates the autoreponder. - Select the Custom View to set up the recipient list for the autoresponder.
- Select a Folder for the autoresponder.
- Select Static or Dynamic and specify the corresponding details. (Refer the table for the list of standard fields)
- Static- Autoresponder in which the Follow-up happens on a fixed date.
- Dynamic - Autoresponder in which the Follow-up happens on predefined intervals set by you.
- You can add follow-ups if needed. After selecting the email template in the follow-up, you will be prompted to enter the From and Reply to email addresses.
Here you can choose your account email address, email address of the record owner and the organization email form the drop-down list.
- Enter the Name of the autoresponder.
- Click Save.
Note
- The autoreponder email will not be sent to the records for which the Email Opt Out is enabled.
- Only when you clear the Email Opt Out check box in the Record's Details page, the autoresponder emails will be sent to those records.
- If you choose an individual email address in the from field, then in the address in the reply to field has to be an organization email address.
If you choose organization email address in the from field, then in the address in the reply to field has to be an individual email address.
The following table gives the list of fields and their description when Static option is selected.
| Fields | Description |
| Follow-up Date | Specify the follow-up date. The follow-up date is calculated with respect to the day when the autoresponder is initiated. |
| Email template | Choose the template from the drop-down list. |
The following table gives the list of fields and their description when Dynamic option is selected.
| By Day -Fields | Description |
| Recur every ___ day(s) | Enter how often in days the autoresponder should be repeated. |
| Recur everyday | Select this if the autoresponder should be repeated everyday. Select the Start date (MM/dd/yyyy format) and time for the autoresponder. |
| End by | Select the End date for the autoresponder in MM/dd/yyyy format. |
| No end date | Select this if the autoresponder should continue repeating till you specify an end date. |
| Choose Email Template | Choose the template from the drop-down list. |
| Add Follow-up | Click the link to add follow-ups for the autoresponder. Example: The autoresponder is initiated on 01-01-2010 and the follow-up dates specified are After 3 days and After 10 days. In such a case, the first follow-up email will be sent on 04-01-2010 and the second follow-up email will be sent on 11-01-2010. |
| By Week -Fields | Description |
| Recur every ____week(s) on S-M-T-W-T-F-S | Enter how often in weeks the autoresponder should be repeated. Then, select the checkbox(es) that correspond to the day(s) of the week on which the recurrence should occur. |
| Start by | Select the Start date (MM/dd/yyyy format) and time for the autoresponder. |
| End by | Select the End date for the autoresponder in MM/dd/yyyy format. |
| No end date | Select this if the autoresponder should continue repeating till you specify an end date. |
| Choose Email Template | Choose an email template for the autoresponder from the drop-down list. |
| Add Follow-up | Click the link to add follow-ups for the autoresponder. Example: The autoresponder is initiated on 01-01-2010 and the follow-up dates specified are After 3 days and After 10 days. In such a case, the first follow-up email will be sent on 04-01-2010 and the second follow-up email will be sent on 11-01-2010. |
| By Month - Fields | Description |
| Day __ of every ___ month(s) | Enter how often in months and on the specified date the autoresponder should be repeated. |
| ____ ____ of every month | Select a particular day when the autoresponder should be repeated every month. |
| Start by | Select the Start date (MM/dd/yyyy format) and time for the autoresponder. |
| End by | Select the End date for the autoresponder in MM/dd/yyyy format. |
| Choose Email Template | Choose an email template for the autoresponder from the drop-down list. |
| Add Follow-up | Click the link to add follow-ups for the autoresponder. Example: The autoresponder is initiated on 01-01-2010 and the follow-up dates specified are After 3 days and After 10 days. In such a case, the first follow-up email will be sent on 04-01-2010 and the second follow-up email will be sent on 11-01-2010. |
Create Folders
Related Articles
Email Templates are now available in the Zoho CRM mobile app
The capability to use email templates has now been introduced in the Zoho CRM mobile app. This means that you can very easily send standard emails whilst on-the-move. I have a client that makes collections and needs to provide photo evidence of the ...Zoho CRM Custom Sales Signals
Custom SalesSignal The SalesSignals feature in Zoho CRM provides real-time notifications of all touch points from your leads, contacts, or potential customers. You can keep track of all the customer interactions across various channels and follow-up ...Adding Fields to Zoho Analytics
Can I add custom columns or new fields? Yes, you can add custom columns or new fields. Follow the steps given below to synchronize your custom columns into the Advanced Analytics connector for Zoho CRM: From Zoho CRM: Login to your Zoho CRM account. ...Merging Duplicate Records
Merging Duplicate Records Over a period, there may be a chance of accumulating duplicate records. You can search the duplicates and merge them for a better organization of records. Find & Merge Duplicate Records This feature gives you the option to ...Zoho Desk : Insert HTML in Desk Templates
For a professional look, insert pre-built HTML code to your Zoho Desk Templates. Pre-requisites: Administrator Access to Zoho Desk Pre-built HTML code as required Process: In Zoho Desk, go to the settings cog and open the Settings menu: Go to ...